Turbo replacement
A turbo replacement guide for Saab 9-5 4-cylinder engines.
Before changing the turbo unit
1. Raise the car, place a receptacle under the car and drain the oil via the drain plug in the oil sump. Refit the drain plug.
2. Lower the car and fill with oil to the MAX mark. The distance between the marks corresponds to a volume of 1 litre (1.05 qts).
3. Start the engine and let it idle until the thermostat opens (radiator fan starts).
4. Raise the car and drain the oil. Refit the drain plug.
Tightening torque: 25 Nm (19 lbf ft)
5. Undo the oil filter using the filter wrench and remove the filter. Wipe clean the surface sealing on the engine.
6. Oil the rubber gasket on the new oil filter and fit it. Tighten the filter by hand.
7. Lower the car and fill with oil to the MAX mark. The distance between the marks corresponds to a volume of 1 litre (1.05 qts).
8. Make sure there are no oil leaks after starting the engine.
Oil capacity
4.0 litres (4.3 qts) including filter
To remove
Warning
Take care if the car is warm. The coolant is hot and there is also a risk of burning yourself on the exhaust manifold.
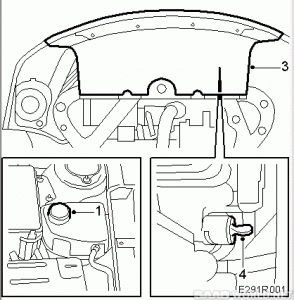
1. Open the expansion tank cap to release the system pressure.
2. Raise the car.
3. Remove the lower front cover.
4. Drain off the coolant.
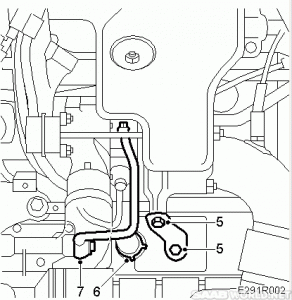
5. Remove the turbo stays.
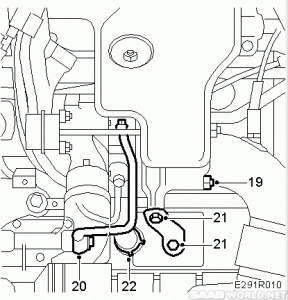
6. Loosen the return oil nipple and the pipe from the turbo to the cylinder block. Plus the hole in the block.
7. Loosen the oil pipe between the oil filter adapter and the turbo (at the turbo).
8. Lower the car to the floor.
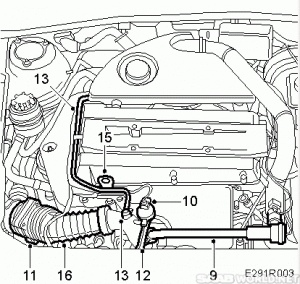
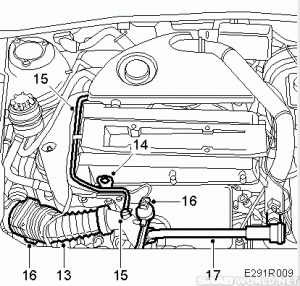
9. Remove the bypass pipe and valve.
Note
There is an O-ring at the bypass pipe’s attachment to the turbo intake pipe.
10. Unplug the connector from the control valve.
11. Unplug the mass air flow sensor connector.
12. Loosen the hoses to the turbo and diaphragm housing.
13. Unscrew the crankcase breather pipe’s banjo bolt from the intake manifold and unscrew the bolt from the camshaft cover.
14. Bend the pipe and wiring aside.
15. Remove the engine lifting eye.
16. Remove the mass air flow sensor and air hose.
17. Remove the exhaust manifold heat shield. The heat shield is attached with a nut and two clips on the underside.
18. Undo the quick release coupling on the evap hose with tool 83 95 261 Fuel line tool.
19. Undo the intake manifold’s V-clamp at the turbo.
20. Lift out the intake manifold.
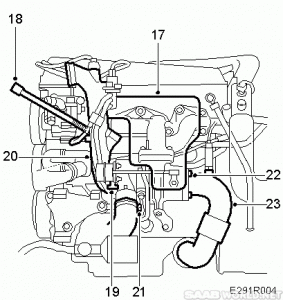
21. Undo the hose clip on the hose between the charge air cooler and the turbo (at the turbo). Plug the hose to prevent dirt entering the hose, use plug 83 94 595 Plug, turbo hose or similar.
22. Loosen the front exhaust system from the turbo.
23. Carefully lower the front exhaust system away from the turbo.
Important
The flexible bellow on the front section of the exhaust system must not be bent more than 5° from its neutral line. This means that if the front exhaust system is left hanging freely, it must not be bent more than by its own weight. If the strain on the pipe is too great, its component parts will be permanently deformed. This can cause noise, leaks and eventually complete breakdown.
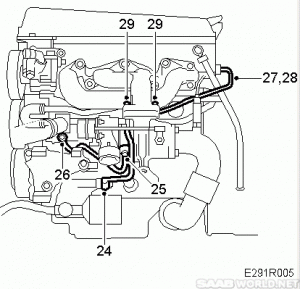
24. Remove the oil pipe from the oil filter adapter. Collect the copper washers.
25. Undo the coolant pipe by the turbo. Keep the copper washers safe.
26. Slacken the coolant pipe bolt by the coolant pump.
27. Detach the coolant return pipe from the cylinder head and also from the pressure sensor bracket. Collect the copper washers.
28. Undo the coolant return pipe bolt by the turbo.
29. Undo the nuts securing the turbo to the exhaust manifold.
Note
Apply motor oil or the like to the nuts and carefully undo them.
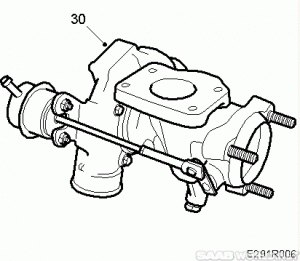
30. Remove the turbo.
To fit
Important
It is essential that there is oil in the turbo bearing housing when the engine is started. An extra check should be made when fitting a new turbo. Fill the turbo oil inlet with oil from an oilcan. Rotate the compressor wheel by hand many times to ensure that oil enters the bearings.
Note
Coat the studs thinly with Molycote 1000, part No. 30 20 971, or similar.
Note
Spray the connector with Kontakt 61, part no. 30 04 520, before plugging in.
1. Fit the turbo. Tighten only the two upper locknuts at the connection between the turbo and the front exhaust system.
Tightening torque: 24 Nm (18 lbf ft)
Important
When fitting the front exhaust system to the turbo, the nuts should be tightened alternately to avoid distorting the flange. The flange must not abut against the turbo connection flange.
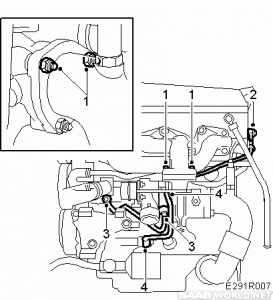
2. Fit the turbo coolant return pipe. Fit new copper washers.
Tightening torques:
Nipple in cylinder head: 35 Nm (26 lbf ft)
Banjo screw, cylinder head: 25 Nm (18 lbf ft)
Coolant return pipe/turbo 25 Nm (18 lbf ft)
Clamp, coolant return pipe 9 Nm (7 lbf ft)
3. Fit the coolant return pipe to the turbo. Also, tighten the pipe by the coolant pump. Fit new copper washers.
Tightening torques:
Banjo screw, turbo: 25 Nm (18 lbf ft)
Banjo screw, coolant pump: 20 Nm (15 lbf ft)
4. Fit the turbo oil pipe (connection to the turbo). Use new copper washers.
Tightening torques:
Banjo screw, turbo: 20 Nm (14 lbf ft)
5. Fit a new O-ring, greased with non-acidic vaseline, on the turbo intake pipe. Fit the V-clamp on the pipe and position it. Bolt the pipe to the power steering pump bracket to facilitate tightening/fitting the V-clamp.
6. Slacken the adjusting screw on the intake manifold to adjust the pipe.
7. Tighten the V-clamp between the turbo and the turbo intake pipe.
Tightening torque: 3 Nm (2 lbf ft)
8. Tighten the intake manifold bolt in the power steering pump mounting. Also tighten the adjusting screw.
Tightening torque: 24 Nm (18 lbf ft)
9. Connect all the hoses to the turbo and the diaphragm housing.
10. Remove the plug from the charge air cooler inlet pipe.
Important
To reduce the risk of hoses mounted on the delivery side of the turbocharger coming loose due to low friction at high air pressure, the hoses and connecting pieces must be cleaned thoroughly before fitting. Use a rag dampened with 93 160 907 Motip Dupli cleaning agent to wipe clean inside the ends of the hoses. Clean the connecting pieces as well. If hose clips are rusty or damaged, they must be replaced so the correct clamping force is maintained.
11. Connect the charge air cooler’s inlet hose to the turbo.
Tightening torque: 8 Nm (6 lbf ft)
12. Fit the heat shield. Press on the left-hand holder first. Apply Molycote 1000, part no. 30 20 971, to the stud.
Tightening torque: 20 Nm (15 lbf ft)
13. Fit the mass air flow sensor and air hose.
14. Fit the engine lifting eye.
15. Screw the crankcase breather pipe’s bolt in the camshaft cover and the banjo bolt in the turbo intake pipe.
Tightening torque: 24 Nm (18 lbf ft)
Important
Fit the turbo intake pipe bolt with new copper washers.
16. Plug in the mass air flow sensor and boost pressure control valve connectors.
17. Connect the charge air bypass valve and pipe. Fit a new O-ring greased with nonacidic vaseline.
18. Tighten the bolts and fit the hose clip.
Tightening torque: 8 Nm (6 lbf ft)
19. Raise the car and fit the third nut at the connection between the turbo and the front exhaust system.
Tightening torques:
Stud: 22 Nm (16 lbf ft)
Locknut 24 Nm (18 lbf ft)
20. Fit the turbo oil pipe (connection to oil filter adapter). Fit new copper washers.
Tightening torque: 25 Nm (18 lbf ft)
21. Fit the turbo stays.
Tightening torque: 24 Nm (18 lbf ft)
22. Fit the return oil connection and pipe from the turbo to the cylinder block. Lower the car.
Tightening torques:
M6 bolts 2x, turbo: 14 Nm (10 lbf ft)
23. Fill up with coolant to MAX. Do not forget to close the drain cock on the radiator
first. For the correct mixture, see coolant . Close the cap.
24. Start the engine and warm it up without load, preferably at varying speeds until the radiator fan cuts in.
25. Turn off the engine and top up with engine oil/coolant as necessary.
26. Raise the car.
27. Inspect the system for possible leaks.
28. Fit the lower front cover.
29. Lower the car to the floor.

